Shared Channels, one of Microsoft’s most anticipated updates, is now available to all tenants. It allows users to have seamless collaboration both within and beyond organizational boundaries. The highlight of shared channels that grabs a lot of attention is users don’t need to switch tenants to collaborate outside the organization. Followed by that, it’s possible to invite Microsoft 365 users to a specific channel without having to add them to the respective team. Isn’t it interesting? Let’s check out how Microsoft Teams Shared Channels work!
Why are Shared Channels Essential?
Previously, a user can’t get added to a Teams channel until he becomes the member of a parent team. Adding a user to a parent team to access a specific channel resulted in oversharing. Also, MS Teams management was becoming increasingly difficult due to the excessive teams creations. Another challenge is that cross-tenant collaboration was hindered as external users had to mask their identity as guest users. But Microsoft addressed both issues in a brilliant way thereby, eliminating tenant switches, and reduction of over-sharing and team proliferation.
In this blog, we are going to see detailed information on
- How to create shared channels?
- Enable Teams policy to establish shared channels
- Shared channel memberships in Microsoft Teams
- External collaboration in shared channels
- Storage on Shared Channels
- Things to know about shared channels
- Limitations of shared channels
How to Create Shared Channels?
Let’s get started with the creation of shared channels. Only a team owner can create shared channels.
- Choose More options > Add channel under the team for which you’d like to create a shared channel.
- Add respective name and description for that channel.
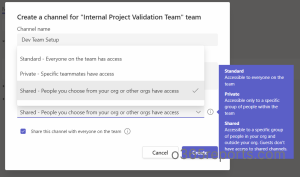
- Click the Privacy dropdown and select Shared channels.
- By default, Share this channel with everyone on the team will be checked on.
- You can check out the box if you want to add only specific members of a team to the channel.
To track the recently created shared channels, you can make use of this user-friendly PowerShell script to audit MS Teams channel creations.
Enable Teams Policy to Establish Shared Channels
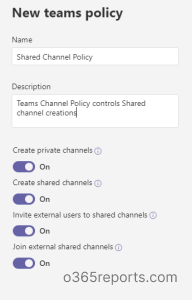
Shared Channels are enabled by default. As Teams channel policy previously had a setting to manage the private channel creation, now it lends its hand to control shared channel creations as well.
Shared Channel Memberships in Microsoft Teams
Users can get added to a shared channel in three different ways given below.
Share with people – This is where you can add everyone within the organization as well as the external users. Members who get added to a shared channel will receive a notification and will be able to access the channel instantly.
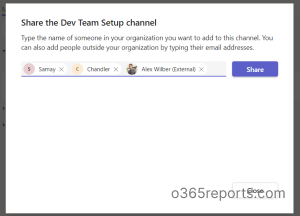
Share with any team – Shared channel membership uses a different approach when it comes to adding a team as a member. Here, you can send an invite to the respective team owner. Then, the team owner will accept the invite on behalf of a team and will be prompted to select a team that they own.

Will this apply to External Organizations? Yes, you can invite an external user who is a team owner in their organization to achieve cross-tenant collaboration.
Share with your team – After creating a shared channel, the owner can choose any team for which he is the owner to make it available to the team. Once added, everyone in that team can access the shared channel.
Note: Due to information barrier policies, you may get the below error while creating shared channels. “The User/Channel can’t get shared with this team. Pick another team or contact your admin for more information.” You can change the IB mode using PowerShell scripts to avoid this error.
External Collaboration in Shared Channels
Shared Channel requires Azure B2B Direct Connect for external collaboration. This feature helps you set a mutual trust between two tenants for seamless collaboration.
With B2B direct connect, managing inbound access (the way other organizations collaborate with you) and outbound access (the way you collaborate with others) becomes easy. To establish a direct B2B connection, both organizations must have access to and from the other organization.
Establishing B2B Direct Connect involves three major steps:
- Adding the External Organization, you want to Collaborate With
- Setting Inbound Access
- Setting Outbound Access.
Adding the External Organization, You Want to Collaborate With
You can enable B2B collaboration by following the steps:
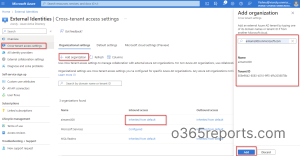
- Sign in to the Azure Active Directory portal.
- Navigate to External Identities –> Cross-tenant access settings.
- Add the organization you want to collaborate with.
- Click the Inherited from default to configure inbound access.
Setting Inbound Access:
Select the B2B direct connect and customize the configuration accordingly. Admins can also able to allow all users and groups or specific ones as they wish.
Step -1
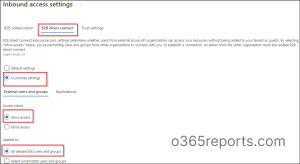
Step -2
After adding the users and groups, admins must add the applications to enable B2B Direct Connect.
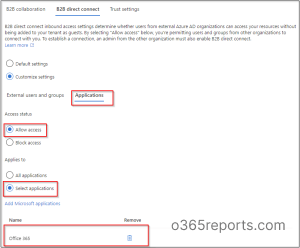
Setting Outbound Access:
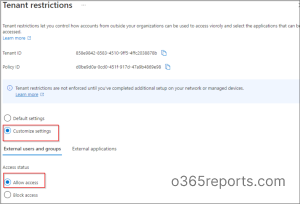
Likewise, outbound access must be enabled at the partner end to complete the collaboration settings. After adding the external organization in External Identities, the user needs to select Inherited from default option under Outbound access. Customize the outbound setting as same as the inbound settings.
Storage on Shared Channels
As we know, when you create a team in Microsoft Teams, it automatically creates an Office 365 group, a SharePoint site, and a group mailbox. Each shared channel has its own SharePoint site separate from its parent site.
Channel messages – Chats on a shared channel are stored in the respective team’s system mailbox. While doing an eDiscovery search, admins can search the respective system mailbox to find the messages and attachments of a shared channel.
Files – Files shared in the shared channels are stored on their own SharePoint Online site. The site can be accessed only by the shared channel owners and members. Even site admins can’t access the site if they are not the members of the shared channel. The host tenant’s conditional access policies will apply to the document that is shared with the external tenant.
Meeting Recordings – Shared channel meeting recordings are stored in the document library of respective SharePoint sites, which can be accessed only by its owners and members.
Things to Know About Shared Channels
- Shared Channels can be created only by Team owners. Only the team owners can accept or decline the invitation to join a shared channel.
- External users are allowed to join instant meetings and scheduled meetings in shared channels. But, only the in-tenant members can start them.
- In addition to eDiscovery, other Information Protection tools like Legal hold, Information Barriers, Retention and DLP, Access Reviews, and Communication Compliance are also supported.
- Each shared channel gets a dedicated SharePoint site.
- When a shared channel is created, the host tenant owns the channel’s data. Only the host’s compliance policies and sensitive labels will apply to the shared channel data.
Limitations of Shared Channels
- There can be only 200 Shared channels per team.
- Shared Channels include 5000 direct members.
- Shared Channels are get shared with a maximum of 50 teams.
- Teams membership includes only the first 25000 members on a channel.
- Apps, bots, connectors, and message extensions are not supported.
- Shared Channel notifications are not included in missed activity emails.
I hope this blog helps you gain detailed knowledge on shared channels. Organizations that routinely work with users outside their organization will see a dramatic improvement in collaboration. Huge kudos to Microsoft Teams shared channels, it is really a game changer.

